Week 1: Nuke 3d and Camera Projection
We started from learning about navigating in the Nuke X for the 3d system. this can be done by going into the Viewer section and clicking the Icon which says 2D or 3D. We can navigate in the scene by Clicking command+mouse and to tilt its Alt

All 3d objects in Nuke have rounded edges. We can use the Axes to move the obj around. To scale up or down, its cmd+shift on the keyboard. we can also put texture on the obj using the node graph and putting the texture in there to apply it.


We can use the 3D node to merge for the 3d obj and assets to merge it all into one. It will be round and red. This can be used to merge the camera and the 3d objects in the node graph. Next we can bring in a camera node which can act as a camera in the 3d environment. In order to see everything in the 3d view we need to add the scalene render node to merge the camera and the objects together. Using these techniques we can see a little animation below.


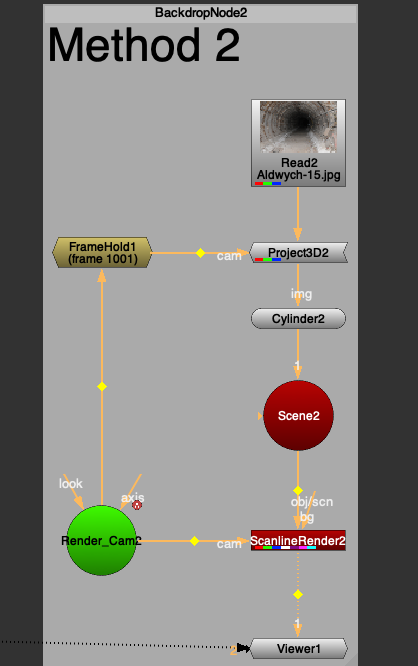
For Camera Projection we need to have a camera and in this case we have a camera with the animation setup Render cam. we then need to project the image on a 3D object which in this case is a cylinder and the image to be projects which is of a tunnel. the project 3d will have a pipe going to the camera and the image to be projected. we will ned a scene node to bring it to the 3d environment and a Scan line render node to bring it back to the 2d environment. We then rotate the cylinder to mimic a tunnel and scale it up to make it into a long tunnel. we then copy the render cam and and name the new one project as we want it to set the projection of the image. then we need to make the image static frame this will be done by turning off the animation for translate and rotate. there are two method and the second method only replace the second cam with the Framehold.

on the next excursive we used the techniques learned in the last semester .e.g. premult blur roto copy to get each side of the room we are working towards. this step was repeated to get all different parts. we used the card obj int his exercise as a 3d object. Following is the video and the final node graph.

Week 2: Nuke 3D Tracking
In week 2 we learnt about how to track in NUKE. We first got the image sequence and the Nuke file into the node. First we bring in a camera Tracker this is used to track the scene. Now we need to mask out area just above the water.


We now need to the setting for camera tracker and change mask to Source Alpha. The range needs to be changed to Customer and from 1001 to 1100. After that we need to track and click solve. After these step we will delete the unsolved tracks and the rejected. Then we select scene under export and press create.


Assignment 2


