Z Brush
Tool/Sub tool:
In ZBrush, I can use the divide option under Geometry tool geometry to give more definition to the surface I’m working on. This gives us more polygons to work with, resulting in a smoother sculpture.
Standard Brush (B – S – T):
The standard brush allows us to build upon the object .e.g. if I want to sculpt a nose, I can use the standard brush to protrude the initial shape on the standard surface in this case, The DynaMesh Sphere.
I can also adjust the size of the brushes by pressing s on the keyboard which is a shortcut to get access to the brush size option.
In order to make a surface smoother we can use Shift key on the keyboard which allows us to make smooth surfaces if it has got irregular or unwanted protrusion.
The focal shift tools controls how sharp the shape would be when using the brushes. We can access and adjust the focal shift by pressing the space key on the Keyboard.
To invert the standard brush I can press the Alt key. It pushes the surface inward. This is a very use full tool to sculpt features like nostrils, eye sockets, gashes, scars ETC.
Shortcuts to Brushes:
Dynamic Trim Flatten (B – T – D)
Move Tool (B – M – V)
Exporting:
In order to take a model out of Zbrush into another program like Maya, we need to export the model file as FBX. We can do this by:
Zplugin – FBX ExportImport – Export and choose the file name.
If I want to export the model in Zbrush in a different file type format:
Document – Export and save the type .i.e. Photoshop *.PSD
JPEG *.JPG
PNG *.png
BMP *.bmp
TIFF *.TIF
Layers:
Layers are useful for tests and experiments on a model. For example, if we put a new layer on a model and are happy with it we can then blend that layer into the model. If not happy with it, the layer can be taken off. These layers can be exported to Maya as blend shapes. To add a layer to the model:
Tools – Layers – click on the box which says new – press the record button.
Once done with editing the model, we can turn off the rec button which changes the REC to an eye Icon. Turing this eye button on and off gives us an idea of what has been put on the model as a layer. The layer also gives us a slider option which can increase or decrease the level of effect of the layer put on the model.
The layers can be named and multiple layers can be used on a model.
Lightbox:
Lightbox is a file management system. I can use lightbox to open up projects I’ve been working on or new files or the default files present Zbrush:
Lightbox – projects – DynaMesh_Sphere
Morph Target:
Morph target can be used to test out new modelling on the existing model e.g. changing the length of the model or sculpting more using a standard brush. Morph target will allow me to test on the existing model and go back to the original form so I can then switch between the original and the tested out model and if I like the new model I can keep that and make it the new original model. A morph brush does the same function but on the selected areas the brush is being applied on.
Tool – Morph Target – StoreMT: To save the model and make it the restoration point
Tool – Morph Target – Switch: To switch between the new and the original models
Tool – Morph Target – DelMT: To delete any Morph Targets.
Sub Divisions:
Using the button Draw Polyframe (Shift +F) I can see how many sub divisions are in the model, this can been seen in number at the top tab which says ActivePoints. This can be further explored by going to the Subtool and hovering the mouse over the sphere icon. This will show how many polygons are involved in the model. Using less polygons/subdivisions, there will be rough edges when sculpting a model or moulding it further. To smoothen the object and use this tool:
Tool – Geometry – Divide button.
Dividing the object using the geometry divide tool, I will be increasing the polygons and active points to give smoothness to the object being worked on.
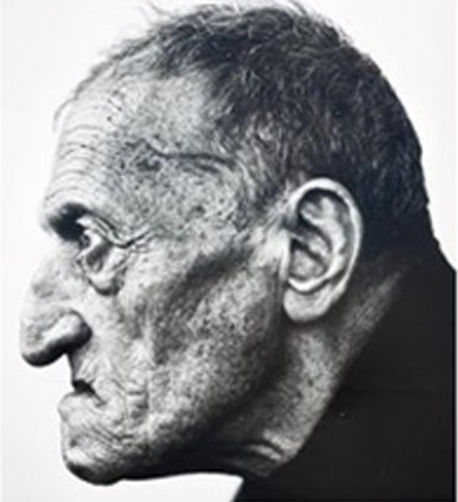
I tried recreating the old man's Nose in Zbrush
Nose Modelling:
.png)
In my opinion it is very important to get the Columellar-labial angle right as it gives the nose the required definition together with all the other factors. here we can see as the nose being sculpted is of an old man, the Columellar-labial angle is steep and very close to the mouth.
I have also focused on the Alar cartilage, the tip of the nose. Using the TrimDynamic brush gives us a good result.
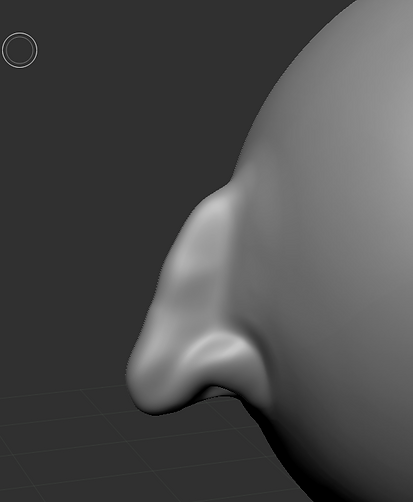
Regular Nose Sculpting attempt:

So the process involves to get the standard brush and start building our basic nose. If we don't have enough Polygons to work with, Pressing Ctrl+D on the keyboard can help us Subdivide. Key is to keep smoothing the sculpt as we build. Standard brush also is a handy tool when creating Alar Cartilages on both sides. Leaving the Symmetry on (X) is also advisable as it will build up both sides even when working on the one side. The DamStandard brush tool is very handy when giving definition and edges to a sculpt. this can be selected by pressing B - D - S on the keyboard.
To manipulate the nose and get a better desired shape, we can use the move tool. this can be done by pressing B - M - V on the keyboard. We can make the Move toll smaller by pressing S on keyboard to work on small areas and make the tool bigger to work on larger areas and manipulate the bigger area all together. We also have a very important tool known as TrimDynamic brush B - T - D which can be used to flatten out the surface. like the Lateral Cartilage.

To get the nostrils, we can make the standard brush smaller by pressing S on keyboard and Alt on keyboard to invert the standard brush role. This will allow us to carve in holes for nostrils in our Nose Sculpt

Getting to know the Nose:

In the picture on the left I have tried and demonstrated different areas of the front of the nose we have learnt about in the class. This is my own sculpt of the Nose
In the picture on the left I have tried and demonstrated different areas of the side of the nose we have learnt about in the class. This is my own sculpt of the Nose

Mouth Exercise:
For the digital sculpture session today, we were first shown different parts of the mouth and the muscles around it and how they function. The exercise we were given was to specify these different part using Photoshop.

Getting to know the Mouth:

Mouth Modelling:
In the picture above I have tried and demonstrated different areas of the mouth we have learnt about in the class. This is my own sculpt of the Mouth

To start I used the DamStandard Brush to layout a basic shape of the mouth, so started out with the Philtrum ,the Marionette lines and the Mental Labial Crease. then i used the move tool to get the basic mouth shape going. then i went on to using the Standard brush to get the Chin and the pillars so i can have a guide to work with when later going into the detail. Always making sure I am using the Smooth as well as I go along.
To build up both lips, I used the standard brush on the DamStandard lines I created earlier. then i used the DamStandard again to get the vermilion borders both on the upper and the Lower lips.

Nose and Mouth Modelling MOV:
Below is my attempt at sculpting the Nose and the Mouth using all the tools we have learnt in the class with Z brush. All the techniques mentioned above in the Nose and the mouth sections are demonstrated in the video below.
Ear Exercise:
For the digital sculpture session today, we were first shown different parts of the ear and how they function. The exercise we were given was to specify these different part using Photoshop.

Getting to know the Ear:

In the picture above I have tried and demonstrated some additional areas of the ear. This is my own sculpt of the Ear
Ear Modelling:

With Ear, I took a different approach. The technique used will be Mask. This can be done by pressing Alt on the Keyboard. Using mask is very useful when sculpting ear as we can create a basic shape and protrude it out of the Sphere. We this invert the mask by pressing Ctrl and click outside the sculpt. I used the Standard brush inside the ear to create different areas mentioned above. I used the Standard Brush for both standard and invert as it allowed me to carve into the inside of the ear as well to get areas like Antitragus, Concha, Superioir Helix and Inferior Helix and almost all of the ear.
I also used the DamStandard brush a lot to get the shapes inside and outside of the ear going. The move tool came in Handy in bringing out the proper shape of the ear. I also used the TrimDynamic Brush to get the edges of the inside of the ear .e.g. Scaphoid Fossa, Triangular Fossa, and also shaping the Crural of Antehelix.

Eye Exercise:
For the digital sculpture session today, we were first shown different parts of the eye and how they function. The exercise we were given was to specify these different part using Photoshop.


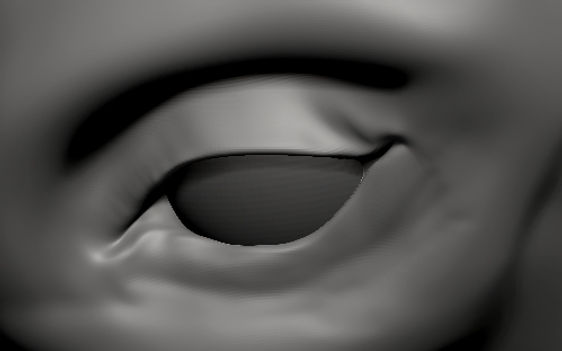
Getting to know the Eye:

In the picture above I have tried and demonstrated different areas of the eye. This is my own sculpt of the eye.
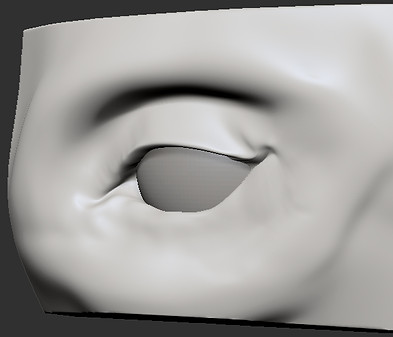
Eye Modelling:

The main Brush i used for the eye is the ClayBuildup Brush. First i created the eye socket. Then I put in an additional sphere in the Model to mimic the Eye ball. this is done by going to Subtool on the right and clicking on append and selecting sphere. We need to be aware that the old object will be selected even when we bring in any new object. So we have to manually select the new object. Then we can adjust the eye ball to the desired position and to get a good result we can turn the transparency on so we can see inside the old object, in this case the skull.
I then kept on building on the eye, focusing on the upper and lower eye lids. I did this by again, using the Clay-buildup brush which is a very handy tool for sculpting eye. Always to make sure to smooth the model all the way through and also to sub divide the polygon if we feel its not enough. Then i moved to DamStandard brush to get the details and the wrinkles going around the eye. This gave me a good Superior and Inferior Palpebral Creases.
I then used the move tool to get the eye to take the shape of a natural looking one. I used Mask tool on the eye as well to surround it with the Orbital Rim above the eye and the Zygomatic bone, below the eye

Final Submissions- Assignment 01:
Nose:
Following are my final Nose Renders and I am also supporting it with the movie file for the sculpting of the Nose.
Renders:


Sculpt Movie:
Mouth:
Following are my final Mouth Renders and I am also supporting it with the movie file for the sculpting of the Mouth.
Renders:


Sculpt Movie:
Ear:
Following are my final Ear Renders and I am also supporting it with the movie file for the sculpting of the Ear.
Renders:


Sculpt Movie:
Eye:
Following are my final Eye Renders and I am also supporting it with the movie file for the sculpting of the Eye.
Renders:


Sculpt Movie:
Mood Board for Villain:
For my idea of a Villain, I am thinking to go for a Medieval Warrior. I have noticed broad shoulders is a trait that suit well with a villain. I will be thinking of covering the shoulders for this villain with armour. I have also noticed that a long thick beard is also a good feature for a villain to have so I will be sculpting a beard and using textures to bring it to life. I have also noticed that Villains have strong face features .e.g the Brow bone is thick and protruding. I am also thinking modelling teeth as bad teeth give a good look to a villain.


Initial Idea for the Villain:
For the initial idea for the Villain, I have thought of giving him a broken nose because I think it will suit my character which is based on a medieval warrior. Secondly I have given my Villain a beard which adds an extra feature to the face. Regarding the mouth, I have given him a frown and he is not showing a lot of emotions. I have shaped the nose to be pointy as this will make my Villain look cunning. I also will be adding some veins to the neck of the Villain to make him appear intense.


Digital Sculpture - Fat
In today's session we were taught about the different areas where fat develops in the face and around the neck. There are two main types of fat, Subcutaneous fat and Structural fat. Subcutaneous fat is the fat that develops under the skin and this fat develops all over the body. Structural fat on the other hand is the one closer to the skull. The two main reasons for this fat is for helping the bones slide around and to provide a structure to push muscles out. When the body is young, the fat is smooth and kept in place tightly. Age separates the fat and can sometimes cause it to sag as the gravity affects the fat. In the image below, we did a class exercise pointing out all the types of fat around the face and some on the neck as well.

Texturing Technique for the Villain Project in Z brush:
In today's session we learnt the texturing technique that can be used to put textures to our Villain sculpts. This is a fairly straight forward technique which required us to have a an Image file for textures that can be painted on the Sculpt further. This can be done by finding a texture file on the internet. So for using this technique we go to Zbrush and first use the Spotlight tool. First we go to Texture from the top bar and click on import and get the downloaded Required image. This will make the setting in the spotlight appear which can be used to paint the texture on the model. We can see the spotlight setting in the image on the right. To get the spotlight tool to apply/paint the texture on the model we click on the 4th button towards the end of the first row in the spotlight settings. This will give us a wheel that is demonstrated in the image below.


To toggle between the texture image and the paint brush/tool, we can press Z on the keyboard. This will look something like the image on the right. so the idea is to switch between the texture and the paint brush and adjust the size and the position of the texture and start painting.
As we have to work on our models on other engines like Maya, we will have to create a texture that can be applied on the model in Maya as well as in Z brush, using the spotlight tools on paints on the Polygons which will only appear in Z brush. So we need to convert the Polypaint into Texture. This can be done by UV mapping the model. This is done by going to ZPlugin - UV master - Unwrap.

This will UV unwrap the Texture, but the texture is still not generated.

To create a texture map we go to Texture map on the right hand side and click on create. then we click on new from Polypaint. to check this we can go to Polypaint and turn off colorize. then will tell us whether the texture map is working or not.
In order to export the model and texture to Maya, we will do these as FBX format. For this we go to the Zplugin - FBXexpotimport - Export and save it to the desired location.

Using the techniques that i learned in today's session, I have applied the textures to my Villain. Now the Villain is no where near completion but we can still see that texturing puts a very nice effect on the Poly Model and gives it a very realistic look. This can bee seen in the image below.

Villain Project Update:
For the Villain project and assessment, I have carried on and worked on my villain model more. I have been able to know give the villain distinct features that makes him stand out and lets the audience know that the sculpture is of a villain. I have given my Villain a bad right eye which has got a huge scar on it. the Villain is wearing an eye patch to cover this hideous injury on his eye. I have also been able to Give him some skin texture (little pores) by using the options in Zbrush. This is done by going to surface and pressing noise button. this will give us more options like scale, strength of the skin texture. Using all these techniques I have been able to achieve the following results for my Villain so far. I have also used some colors like gold and rainbow to see how the sculpt looks like in different gradients. In gold it looks like a Trophy head so I thought I would share it on my website.


Facial Animation Coding system is a system that defines the facial movement and the appearance of different types of emotions on the face. This idea was originally conceived by Carl-Herman Hjortsjö but developed by Paul Ekman and published in 1978. This systems defines many different movements of head and also defines expressions and emotions that are sub divided into Action Units, AU. According to Charles Darwin 1800, there are 7 universal facial expressions .i.e. Happiness, Sadness, Fear, Disgust, Anger, Contempt and Surprise. The FACS focuses on bringing all the different movements involved in the facial muscles together to create these and many more expressions. Below are some of the examples of the Action Units and what they influence
AU0
Neutral expression
AU1
Inner Brow Raiser
AU2
Outer Brow Raiser (unilateral, right side)
AU4
Brow Lowerer
AU5
Upper Lid Raiser
AU6
Cheek Raiser
AU7
Lid Tightener
AU9
Nose Wrinkler
AU10
Upper Lip Raiser
AU11
Nasolabial Deepener
AU12
Lip Corner Puller
AU13
Cheek Puffer
AU14
Dimpler
AU15
Lip Corner Depressor
AU16
Lower Lip Depressor
AU17
Chin Raiser
AU20
Lip stretcher
AU22
Lip Funneler
AU23
Lip Tightener
AU24
Lip Pressor
AU25
Lips part
AU26
Jaw Drop
AU27
Mouth Stretch
AU38
Nostril Dilate
Now there are many more action units involved in the FACS but I have listed a few above. I have also tried and used this on my Villain project, I am providing some screenshots below.


I was able to put animation expression which we can see in the pictures above using the Zbrush Layers option. We can generate blend shapes which can then be taken to maya to animate facial expressions using the FACS. The process involves clicking on the layers button in Zbrush and then clicking on the square with the + icon on it. Now we can name the new layer and give it a Action Unit. So in order to record an animation we press the record button and use the move tool to give the sculpt an expression or emotions .e.g. AU1 which involves the inner brow raising, frontalis muscles pulling up. I also used AU15 which is lip corner depressor. this gave the sculpt in the first picture a look of sadness.
To take the sculpt with the recorded animation data to Maya we create blend shapes. We do this by going into the Zplugin, clicking on Maya Blend shapes and then clicking on Export blend shapes. this will automatically open up Maya and export the animated sculpt.


In Maya we will get the Character sculpt with blend shape sliders and controller. When we select the whole model and control the sliders, we can set the animation that we created in Zbrush .e.g. the Action Units. In the picture below I have shown how this process looks in Maya and also a couple of videos of after I have done some animation on my Villain Sculpt.


The Villain model and Blend Shape Sliders in Maya

Villain Action Units:
Below are some FACS AUs I have applied on my Villain Model
AU 1: Inner Brow Raiser

AU 2: Outer Brow Raiser

AU 5: Upper Lid Raiser

AU 9: Nose Wrinkler

AU 11: Nasolabial Deepener

AU 15: Lip Corner Depressor

AU 17: Chin Raiser

AU 38: Nostril Dilate

Final Renders of Villain
In the following images I have shown my Final Sculpt for the Villain and also the Dynamic poses using the FACS and Action Units.


Dynamic Poses:
Anger: AU1, AU2, AU5, AU9, AU11, AU15, AU17, AU38


Sadness: AU1, AU5, AU11, AU15, AU17.

